Accurate contour detection for inline quality checks


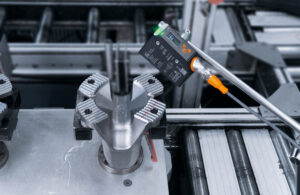
With their new PMD Profiler, ifm presents a new sensor for contour detection that is ideal for quality assurance tasks directly within the process. In contrast to other methods, the new contour sensor is very easy to install and insensitive to ambient light.
The PMD Profiler works by means of triangulation. The sensor projects a straight laser line on the surface to be measured. The sensor’s receiving element (PMD chip) detects the reflection of the laser light. There is an
angular offset between the projection unit and the receiving element, so that the contour sensor can detect an object’s height profile. The PMD Profiler has a measuring range from 150 mm to 300 mm. The proportions of the recorded height profile are independent from the distance between the sensor and the object. This makes it easier to align and position the sensor. Installing and configuring the sensor is very simple as well. Neither external illumination nor screening against extraneous light is required. Three pushbuttons and the guided menu on
the colour display can be used to teach in reference objects. A projected reference line helps define the required area on the object. If the height profile of a reference object is taught in, objects can be compared with this taught-in contour. In this way, deviating components can be distinguished from good parts. This inline quality control reduces rejects since it allows quick identification and elimination of error sources. A switching LED on the sensor indicates whether it is a good part. Via IO- Link, further information, such as the reject rate and the detected object profiles can be transferred to higher-level systems.
The PMD Profiler is typically used in assembly and handling applications. It does not only check if an object is present, but also whether the correct component has been selected and properly assembled. It is also possible to distinguish between parts that have only slight differences (for example, a milled slot). The sensor will also reliably detect other minor differences. It can, for example, check whether a screw is tightened properly or whether a latch is in place.
About the ifm group of companies
Measuring, controlling and evaluating – when it comes to pioneering automation and digitalization technology, the ifm group is the ideal partner. Since its foundation in 1969 ifm has developed, produced and sold sensors, controllers, software and systems for industrial automation worldwide. As one of the pioneers of Industry 4.0, ifm develops and implements consistent solutions to digitize the entire value chain “from sensor to ERP”. Today, the second- generation family-run ifm group has more than 7,300 employees in 95 countries and is one of the worldwide market leaders. The group combines the internationality and innovative strength of a growing group of companies with the flexibility and close customer contact of a medium-sized company.
Contact
ifm electronic India Pvt. Ltd.
Plot No. P-39/1,
MIDC Gokul Shirgaon,
Kolhapur – 416234
www.ifm.com
Phone: + 91 231 2672770
E-mail: info.india@ifm.com


